
Manufacturing Process of Plastic Coating
The previous chapters have provided an explanation of the similarities in operation between dip coating and dip molding. This chapter will now delve into the detailed procedures involved in both manufacturing process of plastic coating.
Plastic Coating Pretreatment Process
The pre-treatment step plays a crucial role in ensuring the proper application of plastic coating onto the metal substrate. These steps are vital for both processes. The pre-treatment process for dip coating is more intricate compared to dip molding, as it involves permanently coating the polymer onto the metal used as a mold. The steps involved are outlined below:
Step 1: Eliminate surface impurities
Impurities can compromise the adhesion of the polymer to the mold or part. They create vulnerable areas where damage can initiate and propagate.
Degreasing:
Oil and grease present on the metal substrate surface act as impurities, which reduce water resistance and hinder normal adhesion and deposition of plastic coating. Grease can be eliminated through alkali washing, pickling or hot degreasing processes.
Stripping:
For previously coated parts, thoroughly remove the old coat before applying the new coat.
Step 2: Change the properties of the substrate
In addition to cleaning the surface, additional properties can be given to produce the desired properties. These characteristics may be helpful in the dipping process itself or in the final use of the product.
Phosphating:
Phosphating, also known as phosphate conversion, is the process of applying a thin layer of phosphate onto the substrate prior to plastic coating. This phosphating layer enhances corrosion resistance in case of any inevitable damage to the plastic coating. The commonly utilized phosphating layers for dip coating include zinc phosphate, iron phosphate, and phosphate triester.
Shot peening:
The process of shot peening involves impacting the surface with spherical particles, resulting in a cold-finished surface. This induces compressive residual stress on the matrix surface to enhance its strength and alleviate any existing residual stress. The presence of residual stress can potentially lead to the formation of microcracks during subsequent processes.
Sandblasting:
Sandblasting induces micropores on the substrate surface, altering it and increasing its surface area for better adhesion of primers, base coatings, and plastic coatings. Common types of sandblasting processes include sand, metal sand, glass bead sandblasting, plastic bead sandblasting, among others.
Deembrittlement:
Deembrittlement is a heat treatment process aimed at eliminating hydrogen that permeates the metal matrix, as the presence of hydrogen increases the susceptibility to brittle fracture under stress. The introduction of diffused hydrogen occurs during prior pretreatment steps, such as pickling and phosphate applications.
Step 3: Improve the quality of plastic coating
Apply the following to the surface of the substrate to improve the coating quality
Primer:
The primer acts as a preparatory coat layer to increase the adhesion between the substrate and the plastic coating. It also provides additional protection to the coated substrate.
Base coating:
Base coatings are additional coatings that provide special properties to finished parts, such as UV and scratch resistance. The base coating is generally not used alone and usually performs its function when combined with the main plastic coating.
For the dip molding process, a release agent is applied or fixed on the surface of the mold to help remove the molded part. Silica gel and permanent polytetrafluoroethylene (PTFE) are the most widely used release agents. Once the pre-treatment step is complete, the mold is dried to remove moisture. Residual moisture causes expansion from the heat introduced in subsequent steps. This leads to the formation of voids or bubbles.
Manufacturing Process of Plastic Coating
Step 4: Pre-heat the mold
The mold is subjected to controlled heating in the oven at a predetermined temperature and duration, wherein the heating temperature serves as one of the pivotal parameters governing the coating thickness of the components. The quality of heat distribution relies on both mold design and airflow management within the oven. Ensuring uniform mold heating is crucial for achieving consistent coating thickness throughout the material.
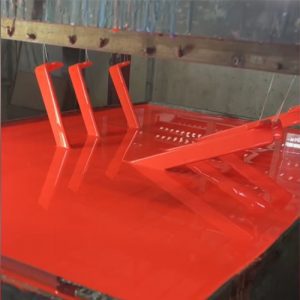
Step 5: Dip the mold
Immerse the heated mold partially or completely in the liquid polymer ( PVC plastisol or PE plastisol ). The polymer adheres to the surface of the mold. The external dimension of the mold is the internal space of the part. Residence time, or the time the mold is immersed in the liquid polymer, is also one of the parameters that determines the final coating thickness of the part. A longer residence time produces a thicker coating. The speed of immersion and exit from the mold is also a key parameter to consider, depending on the characteristics of the liquid polymer used. These rates are determined by the manufacturer during the optimization phase. As a rule of thumb, these speeds must be slow to control the flow of the liquid polymer and obtain a smooth surface. Exiting the mold too quickly after the residence time will result in surface irregularities. However, if the mold is immersed and withdrawn too slowly, the resulting coating will be too thick. More advanced plants use fluidized beds of fine polymer powders to replace traditional liquid polymer solutions. The concept is similar to the traditional method. Once the fine polymer powder touches the heated surface of the mold, it melts and adheres to it.
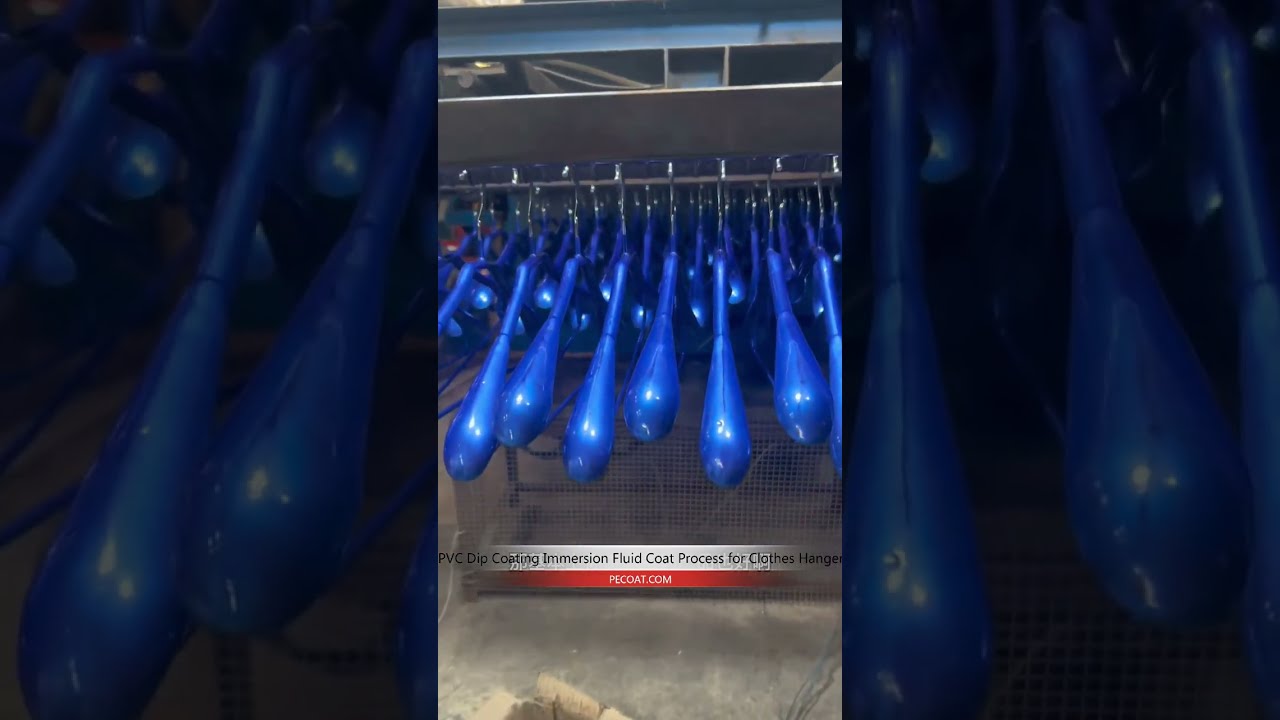
Step 6: Drain excess polymer
Allow excess liquid polymer to drain from the surface of the mold. Multiple dipping steps can be performed to achieve a desired thicker coating, or specialized coatings can be utilized.
Step 7: Cure the coating
The coating undergoes curing in the oven, facilitating a more thorough polymer setting process and complete evaporation of excess water, solvents, and additives. This step is crucial for achieving the final mechanical properties of the polymer, such as rigidity and flexibility. In thermosetting polymers, the curing step leads to full cross-linking of polymer chains.
Step 8: Cool the coating
The cured coating is cooled by immersion in a water tank at temperatures ranging from 122-1112°F (50-600°C), or through forced or natural air convection. The speed of cooling is not considered a critical parameter when compared to other forming methods.
Step 9: Release and demould the product
The finished part is extracted from the frame. In the case of a dip molding operation, the plastic coating is manually or mechanically detached from the mold, thereby separating the individual part from its batch. This yields a finalized plastic component or part. The plastic or plastic coating may undergo additional refinement processes such as notching, punching, printing, and decorating.
Video clip about Manufacturing Process of Plastic Coating
Related Posts:
 Choosing the Best PVC Dip Coating Supplier: Key Considerations
 How To Eliminate Sagging And Air Bubble In PVC Dip Coating,Dip Moulding
 PVC Plastisol Coating Line and PVC Plastisol for Dumbbell Production
 Adhesion Primer improve the adhesion bonding of PVC coatings
 Use PVC Plastisol Coat to Protect Medicine Glass Bottle
 Thermoplastic Coating Process